Customer journey

After your contract is signed

Your Moodus setup, step by step

Four steps stand between a signed contract and a terminal that collects donations. Everything you need for each one is on this page.

Start steps 1 and 2 together

Steps 1 and 2 both happen before your terminal is built, and neither waits for the other. Steps 3 and 4 begin the day your terminal arrives.

Who to contact

Your Moodus advisor is your first port of call for anything in this journey.

Moodus support

Promoboard design

Fiserv merchant support

Opening hours

Monday to Friday, 09:00–17:00. Outside those hours, leave a detailed message and we come back to you as soon as we can. Never share passwords or verification codes by email.
All steps

Step 1 · Start here

Registration form

Everything downstream starts with this form. It gives Moodus the details and documents Fiserv needs to verify your organisation — until it is complete, nothing else can move.

Where to find the link

Have these ready before you start

The form asks you to upload three documents. Gathering them first lets you finish in one sitting.

The form, section by section

Most fields are pre-filled from your offer. Your job is mainly to check them and fill the gaps.

  1. General details

  2. Company address

  3. Delivery contact

  4. Products and design

  5. Invoice details

  6. Bank account and signatory

The documents

This is the part that most often holds a registration up. Fiserv cannot verify your organisation without all three.

Send complete documents

What happens next

Submitting the form is the first step, not the last.

  1. Moodus reviews it

  2. Fiserv verifies your organisation

  3. Your representative confirms their identity

  4. We build and ship your terminal

A complete, accurate form is the fastest route to a working terminal. If anything is missing, we have to come back to you before the process can continue.

All steps

Step 1 · Before shipment

Onboarding with Fiserv

Fiserv processes the donations your terminal collects. Before they can do that, the law requires them to confirm who you are. It takes about five minutes.

What you need

About the screenshots

The screenshots below show the Fiserv and Onfido screens in English. Your own screens may appear in another language, but the buttons sit in the same places.

The eleven screens

Open the link Fiserv emailed you and work through the screens in order.

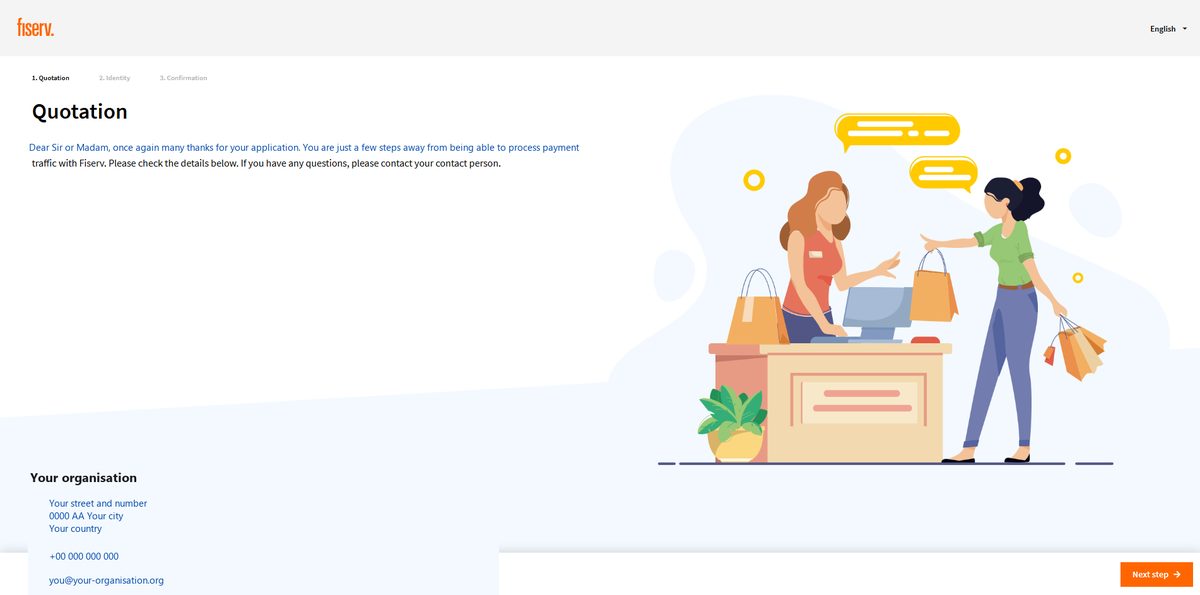
  1. Open the link and check your details

    Fiserv quotation screen
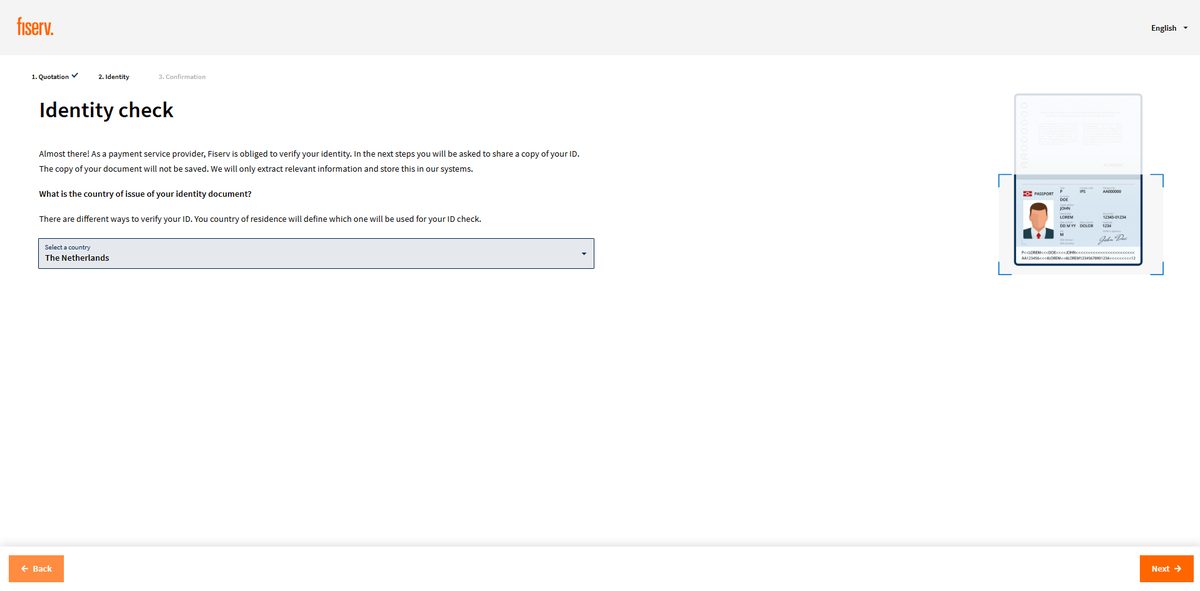
  2. Choose the country of your ID

    Country of issue screen
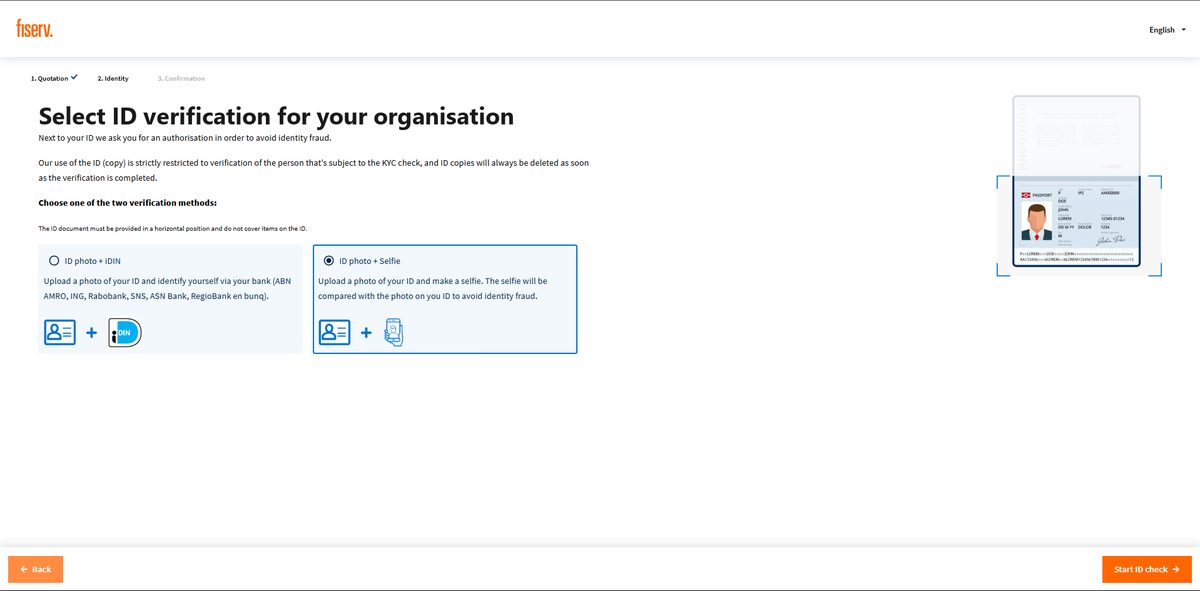
  3. Choose how to verify

    Select verification method screen
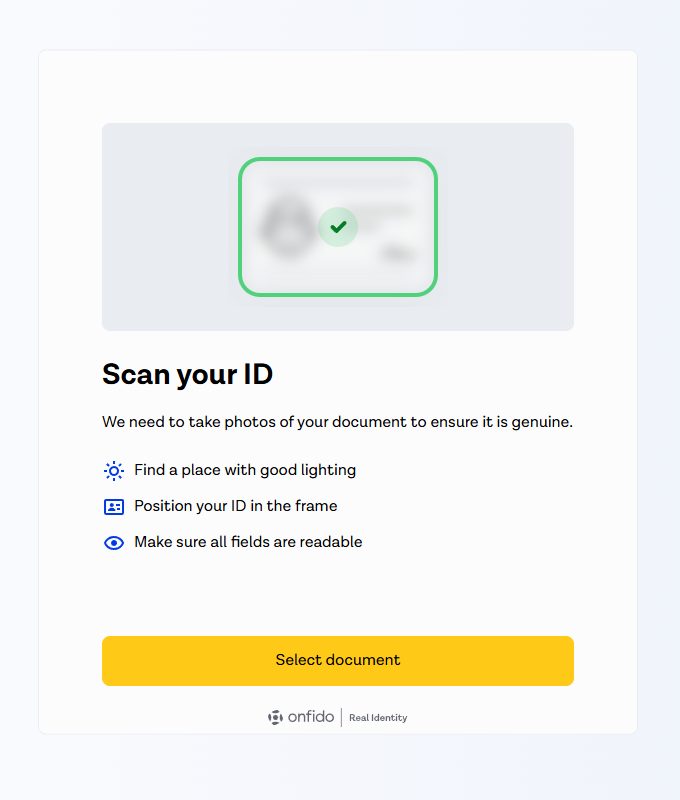
  4. Get ready to scan your ID

    Scan your ID screen
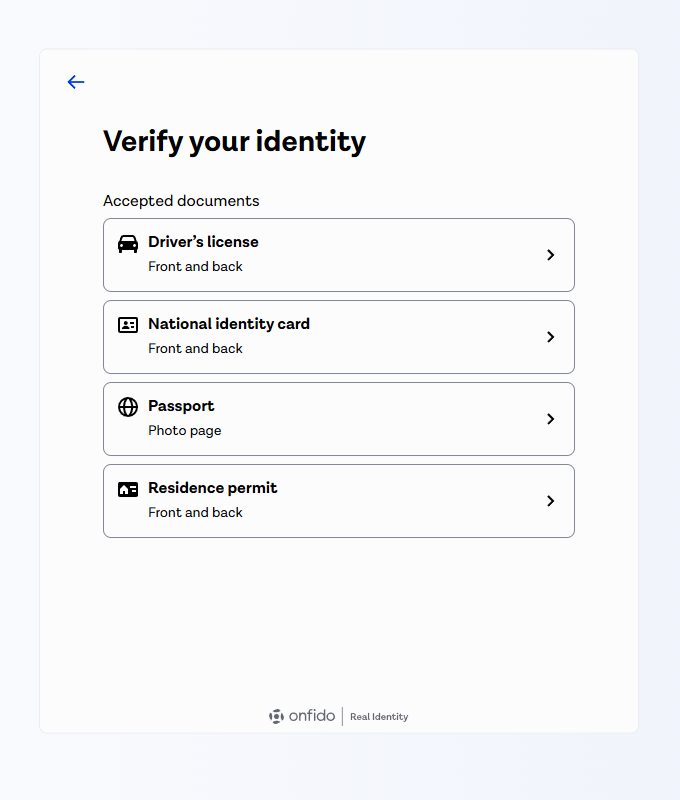
  5. Pick your document type

    Accepted documents screen
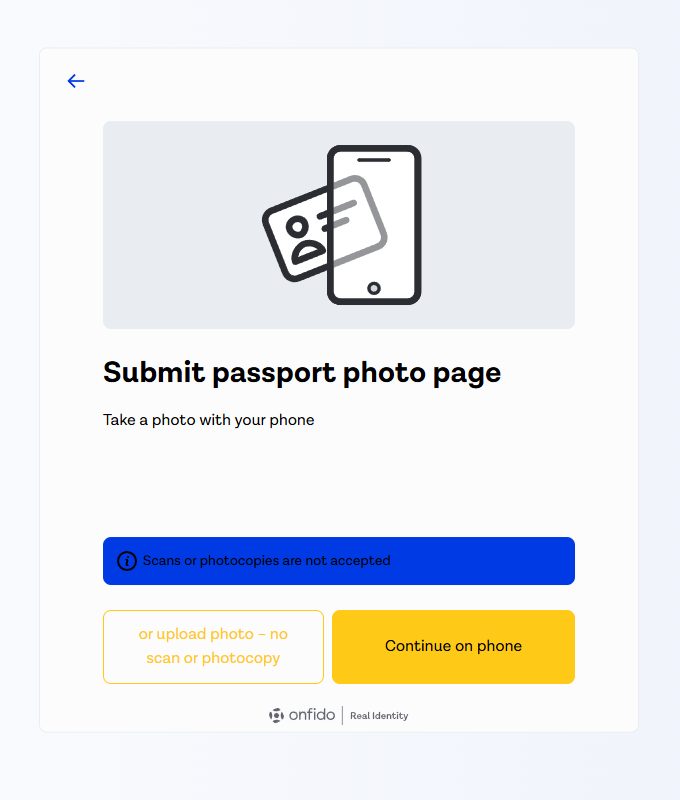
  6. Send the photo of your ID

    Submit document photo screen
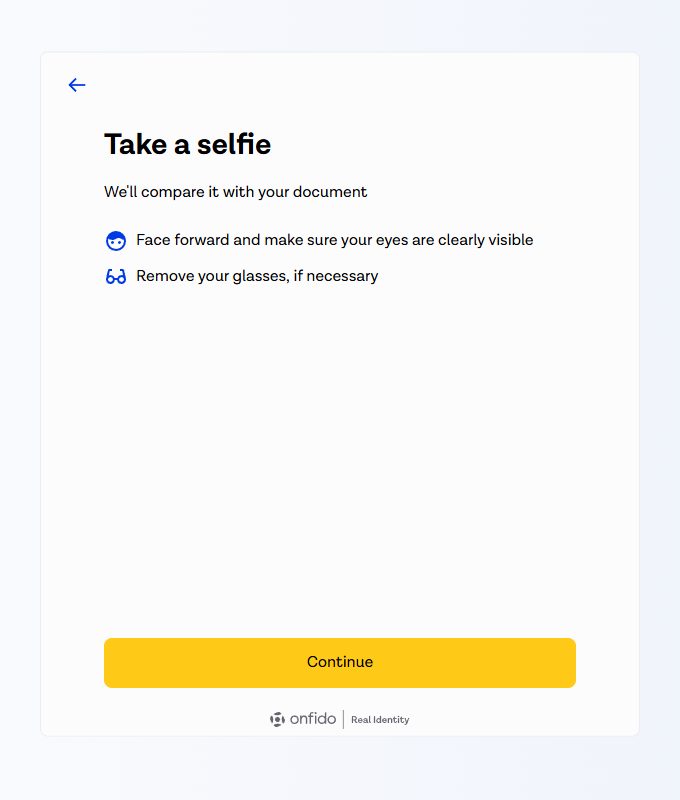
  7. Prepare for your selfie

    Take a selfie instructions
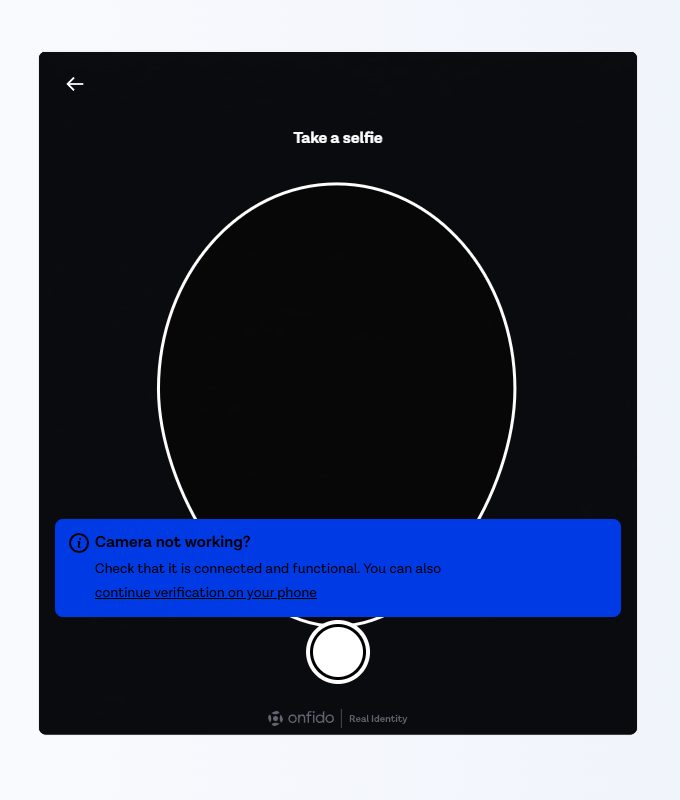
  8. Take the selfie

    Selfie camera screen
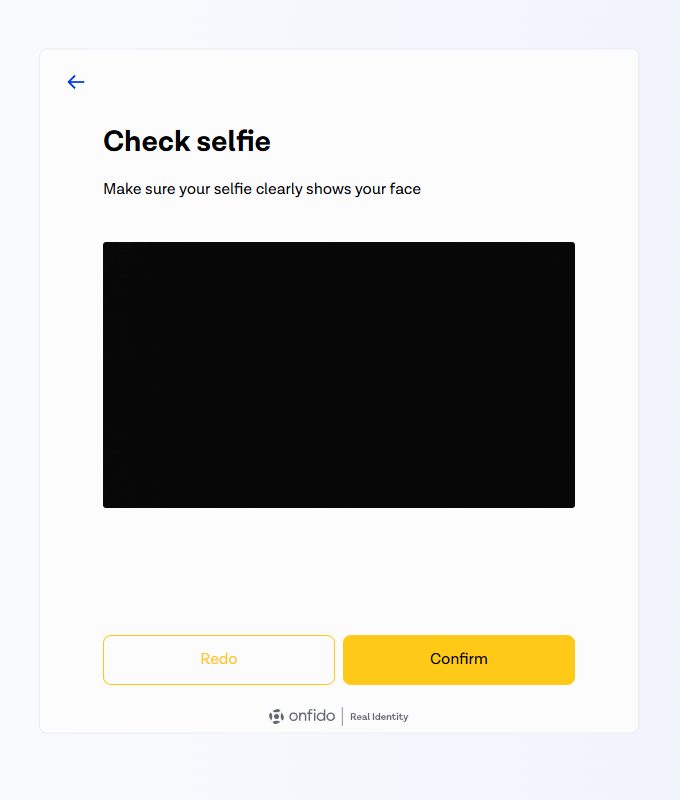
  9. Check and confirm

    Check selfie screen
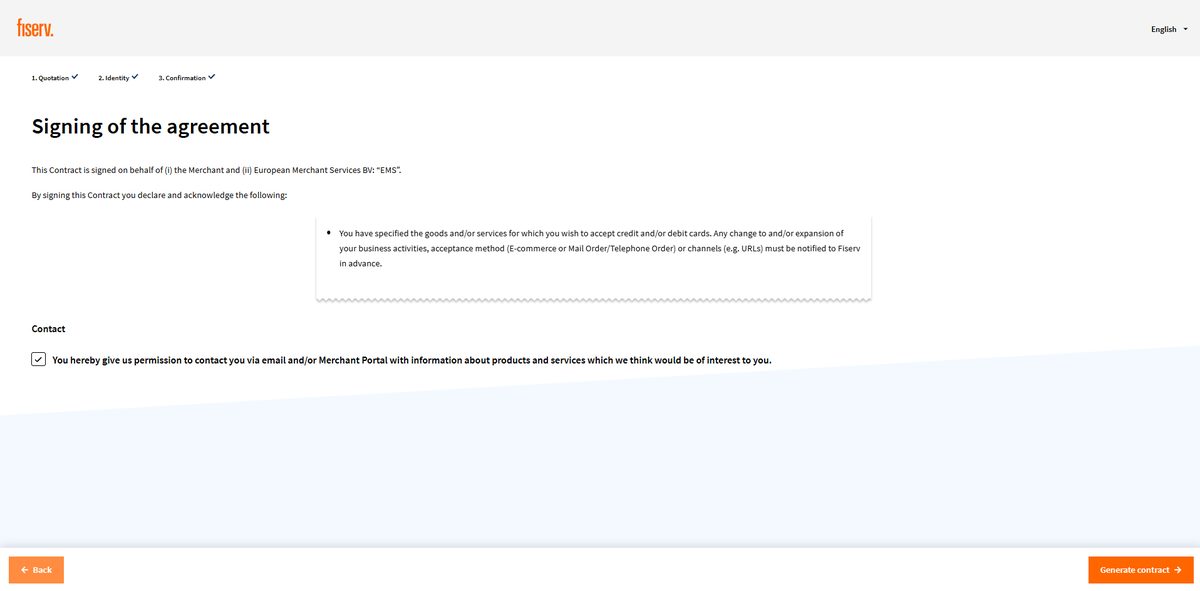
  10. Review the agreement

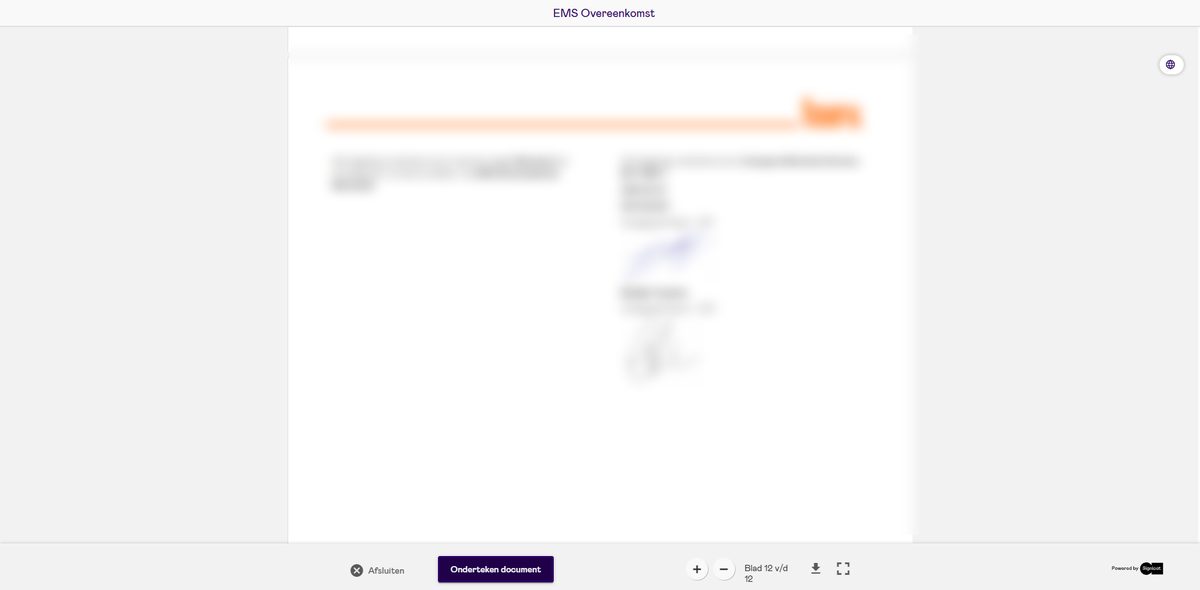
    Signing of the agreement screen
  11. Sign the document

    EMS agreement signing screen

Your identity is verified and your agreement is signed. Fiserv now reviews your application, and your donation terminal can be activated.

If something is wrong, stop

If a name, an address or any other detail on the first screen is incorrect, do not continue. Contact your Moodus advisor first — a generated contract cannot be edited afterwards, it has to be reissued.

The volume-based fee clause

One clause in the Fiserv/EMS agreement worries most clients when they read it. Here is where Moodus stands on it.

All steps

Step 2 · Before shipment

Promoboard design

The promoboard is the printed panel around your terminal. Our in-house designer builds it — this is what they need from you.

What we need from you

We start designing once the required items are in. Anything missing pauses your board.

One revision round

What we cannot use

These look fine on a screen but fall apart at print size. If this is all you have, let us know and we will tell you what is possible.

What is included

The design process covers the design itself. It does not cover correcting or improving the material you send us.

Included

Layout

Bleed & safe zone

Cutting contour

Print file

Not included

Board sizes

Use these to check that your photos are sharp enough at real size.

ModelBoard sizeIncluding bleed
Moodus Give S240 × 350 mm260 × 370 mm
Moodus Give M400 × 600 mm420 × 620 mm
Moodus Give+ S280 × 370 mm300 × 390 mm
Moodus Give+ M400 × 600 mm420 × 620 mm
Moodus Give+ Wallmount400 × 600 mm420 × 620 mm

Approval

Once you approve, your board goes straight into production.

Extra work

Only charged if you ask for it. We always confirm before we start.

WorkPrice
Additional revision round€25
Retouching images€25 per half hour

These same rules also live on their own page, which you can bookmark or forward to whoever prepares your material.

Open promoboard-rules.moodus.com
All steps

Step 3 · On arrival

Terminal assembly

Your terminal arrives ready to use. Assemble the stand, mount the board and switch it on — it goes online by itself.

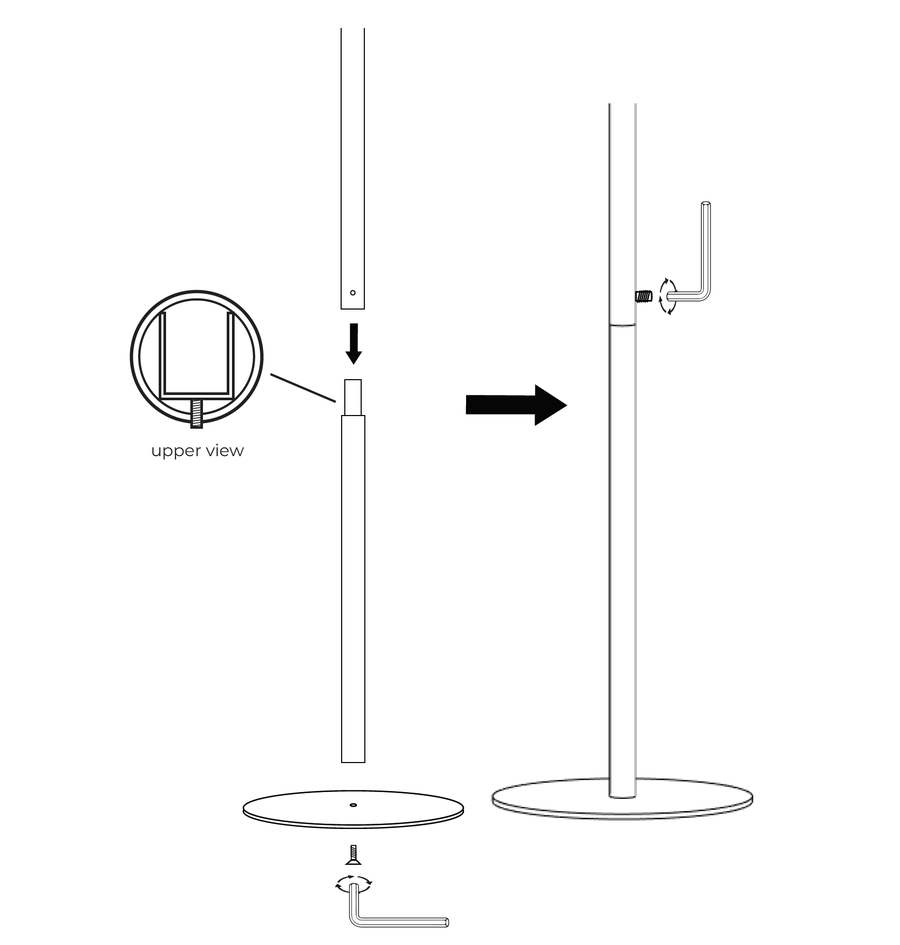
Assembling the stand

For the Give M, Give L and Give+ models with a floor stand. Both Allen keys are in the box.

  1. Attach the base

  2. Insert the upper tube

    Sliding the upper tube into the pole and tightening the screw with the small Allen key
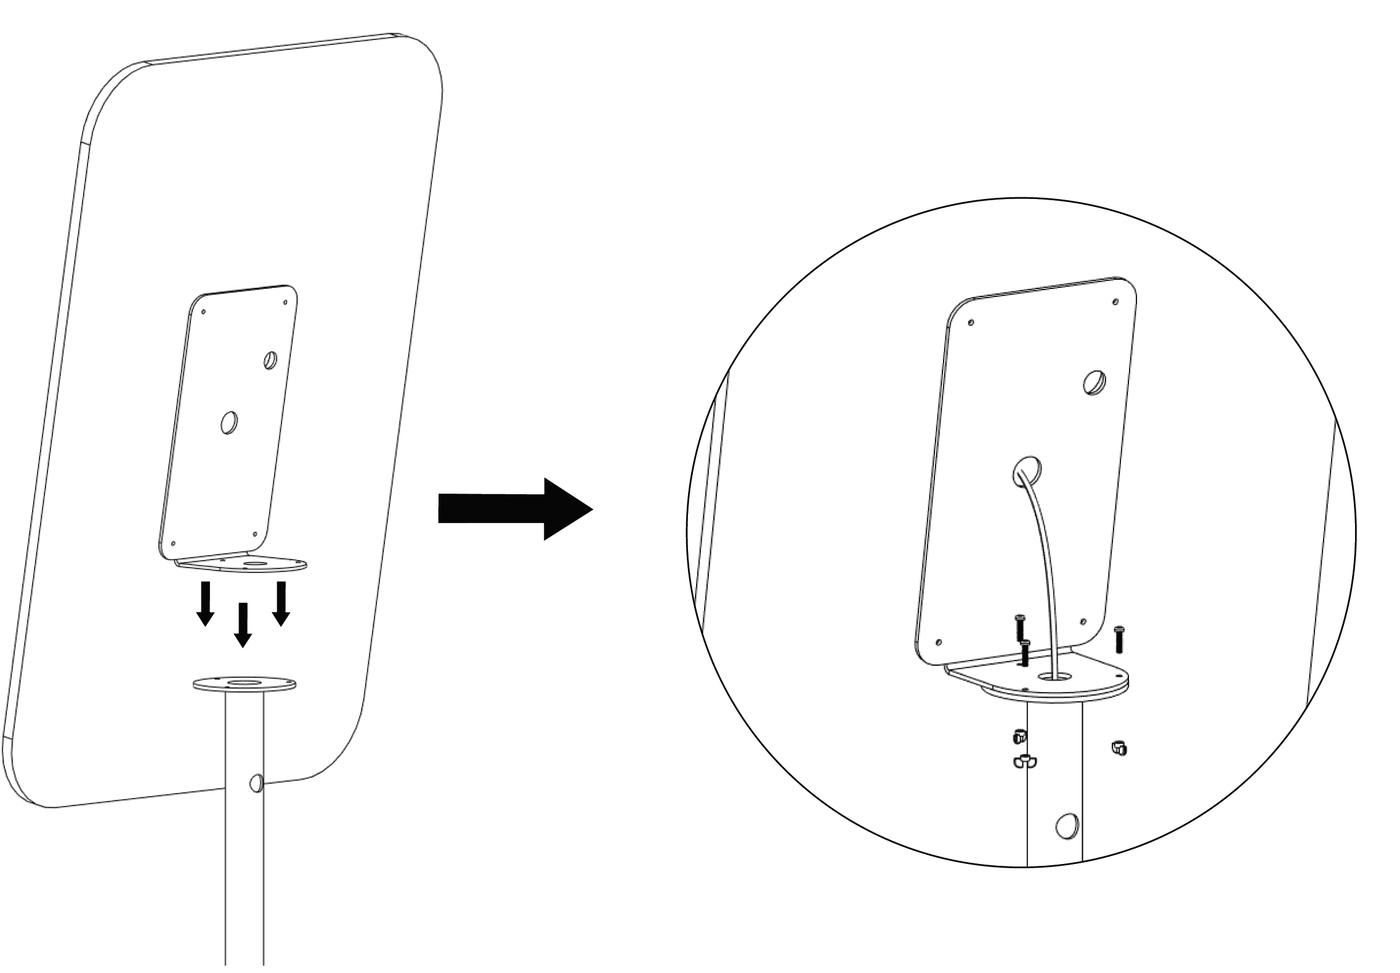
  3. Mount the board on the pole

    Lowering the promoboard onto the pole and bolting the mounting plate down
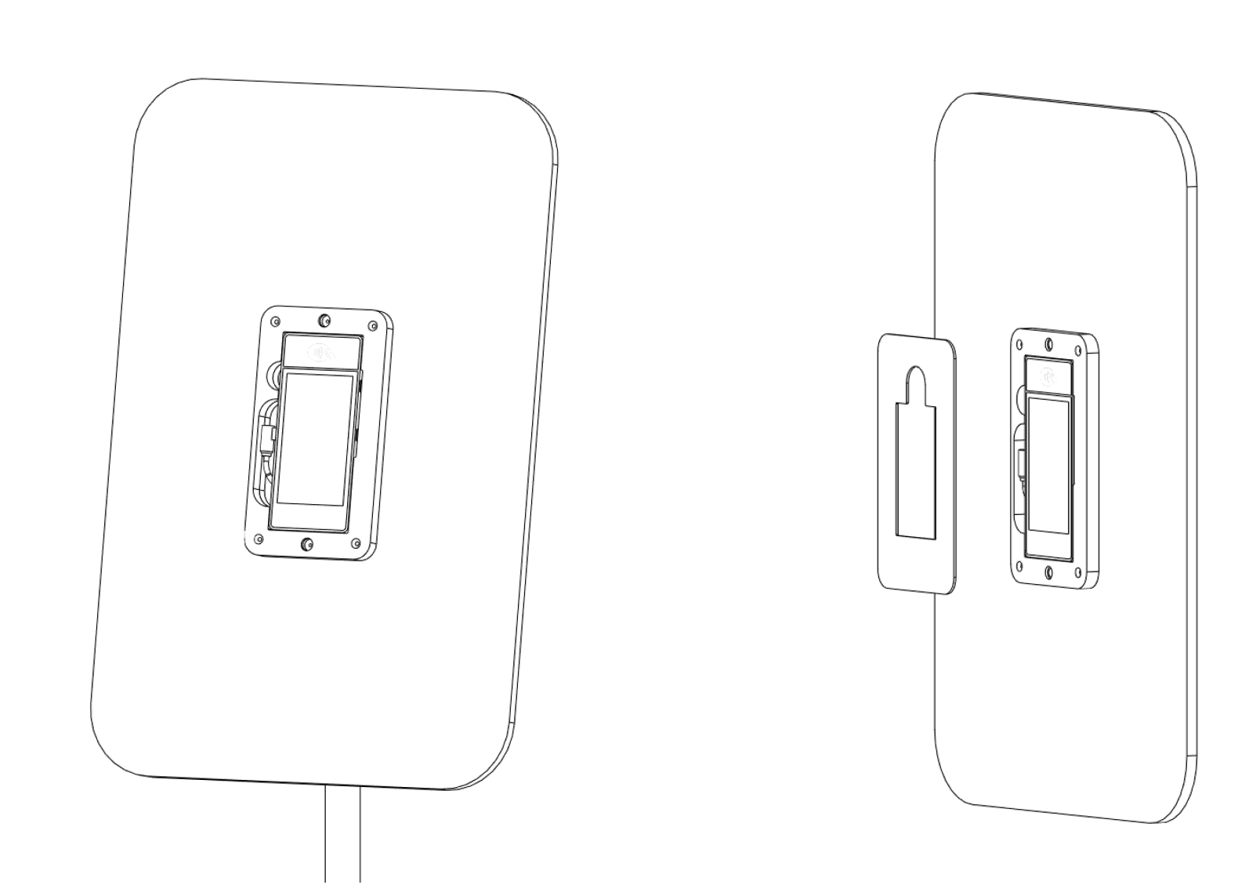
    Standard Give model

    White terminal casing screwed to the pole, promoboard taped to it and the cable plugged into the back
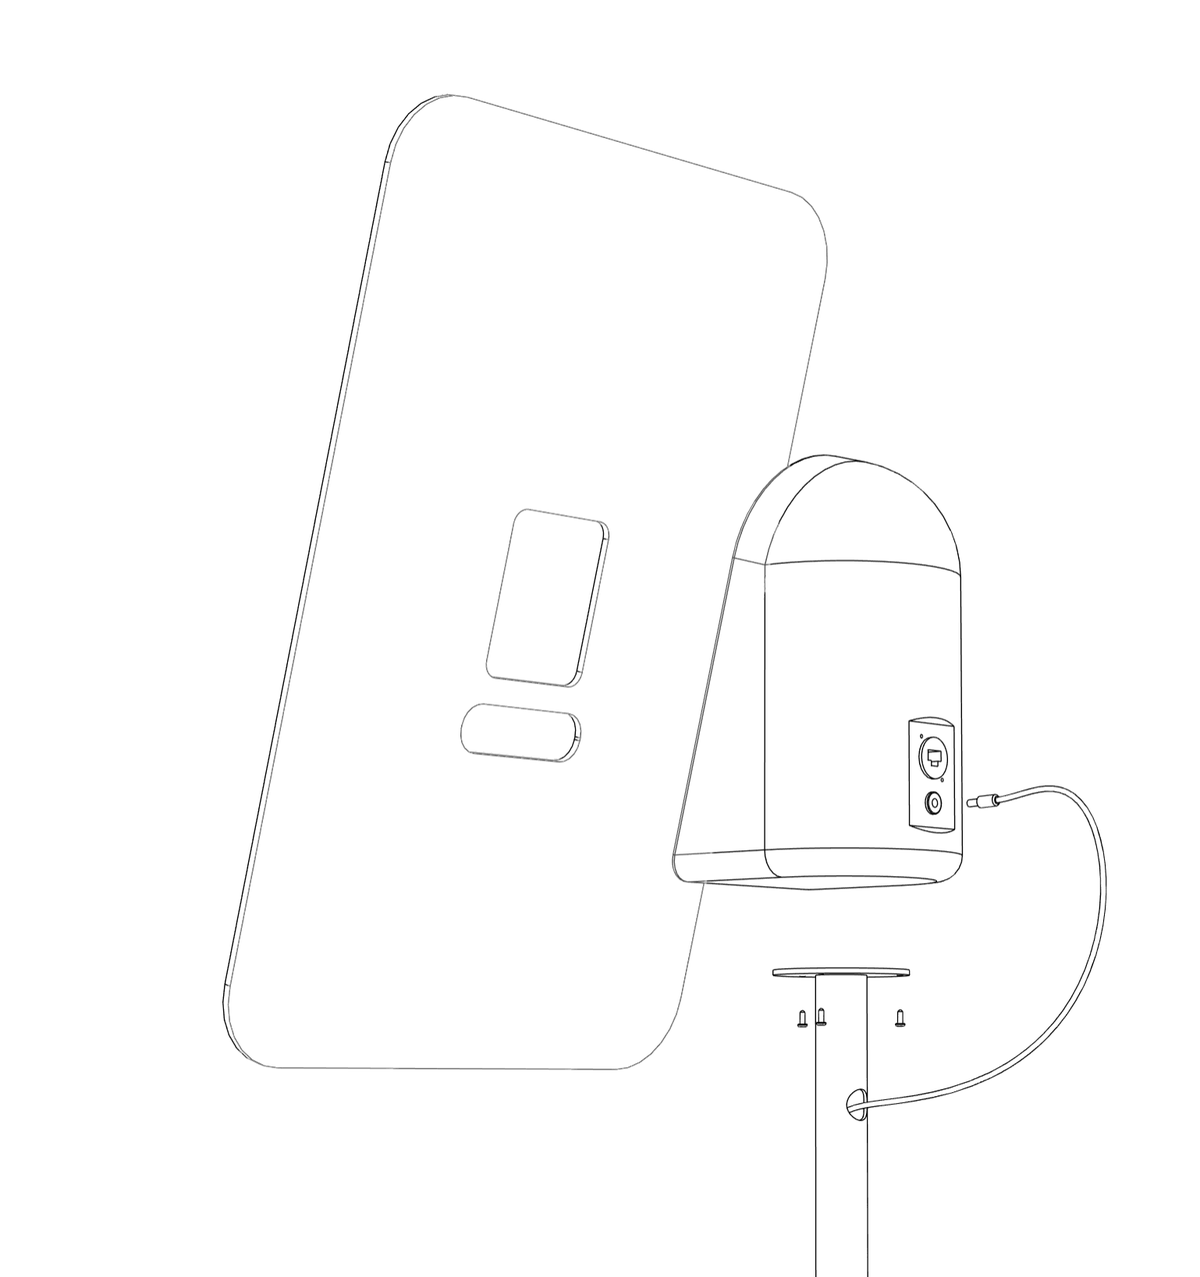
  4. Place and secure the terminal

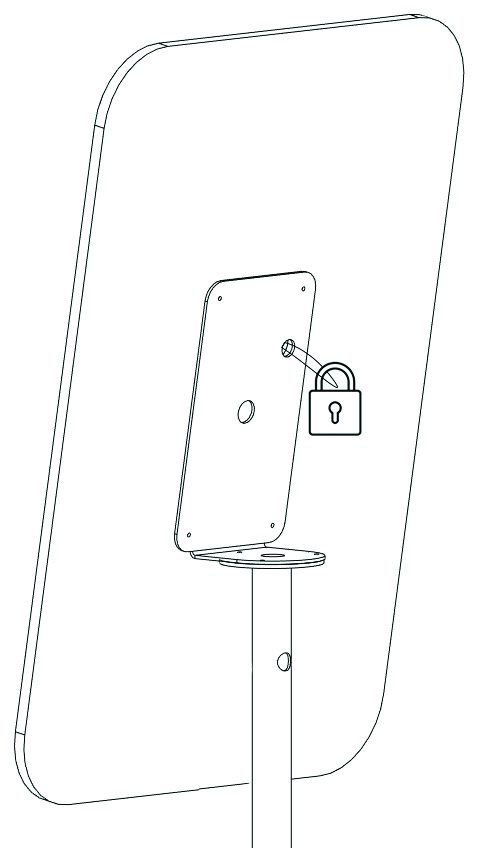
    Securing the terminal with a lock
  5. Connect the USB cable

    The terminal in its bracket and the magnetic plate going on the front
  6. Plug it in

Do not overtighten

Tighten every screw firmly but gently. Overtightening strips the thread and the stand can no longer be fixed properly. The lock for the security cable is not supplied.

Starting the Moodus application

These steps apply to the Moodus + terminal (Castles S1e2).

  1. Switch the terminal on

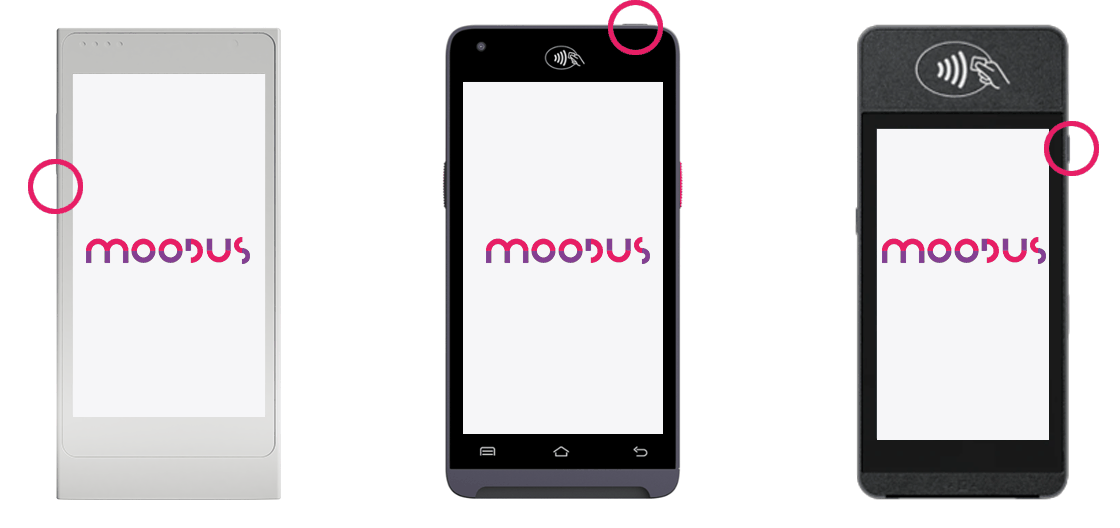
  2. The app starts by itself

    The Moodus splash screen on the Castles S1e2, NexGo N6 and Newland N750, with the power button circled on each

Getting online

The terminal brings its own mobile connection. There is nothing to set up and no network to choose.

It finds the best network by itself

Once the terminal is switched on it connects automatically to the best available 4G network where it stands, and moves to another one if reception changes. No Wi-Fi, no password, no network settings to fill in. If the terminal cannot get online at all, reception in that spot is too weak — move it a few metres or call your Moodus advisor.

Your terminal is assembled, online and running the Moodus application. What is left is configuring it — that is step 4.

All steps

Step 4 · On arrival

Portal access

Two portals, two jobs. The Moodus dashboard configures your terminal and shows your donations. The Fiserv Merchant Portal shows your payouts and invoices.

A · The Moodus dashboard

dashboard.moodus.io — your central portal for every terminal you own.

  1. Log in

    Moodus dashboard login
  2. Find your terminal

    Terminals tab
  3. Set your donation amounts

    Terminal configuration page
  4. Name, title and logo

  5. Choose the project type

    Application type dropdown

The three project types

Single project

Custom project

Multi-project

Terminal showing a single project
Terminal showing a custom project
Terminal showing multiple projects
  1. Configure a custom project

    Locations and celebrations configuration
  2. Configure a multi-project

    Multi-project configuration
  3. Decide what happens after a donation

Restart the app after every change

Transactions and reports

B · The Fiserv Merchant Portal

Where you see your settlements, statements and invoices. Fiserv creates the account for you — you activate it.

  1. Open the activation email

  2. Check the mobile number

  3. Enter the verification code

  4. Note your username, set a password

  5. Choose a security method

  6. Log in

Two-factor authentication

Fiserv asks for a second proof of identity every time you log in. Pick the method that suits how you work.

Google Authenticator app

Google Authenticator extension

WebAuthN

Adding a second method later

Changing your details later

That is the full journey. Your terminal is live, configured, and both portals are in your hands.

Who to contact

Moodus support

Promoboard design

Fiserv merchant support